A password link has been sent to your email address
Reset password
GM Gabuzyan Hovhannes
Theoretical Rook Endgames - All you Need to Know U2000 Level
What are the most important Rook endgame concepts that players below 2000 rating should know? GM Gabuzyan shares what they are in this article.
Endgames | 7 min read
One of the most painful moments in my career happened when I was 11.
I was playing in the Armenian National Youth Championship. In the previous year, I had a big failure in this same tournament. So this time, I had trained hard and was ready to compete for the title.
Everything was going as planned, a win in the final game would make me the champion and give me a chance to play at the World Youth Championship. At that time, it was my biggest dream (Until I grew up and realized what a sports car is😅).
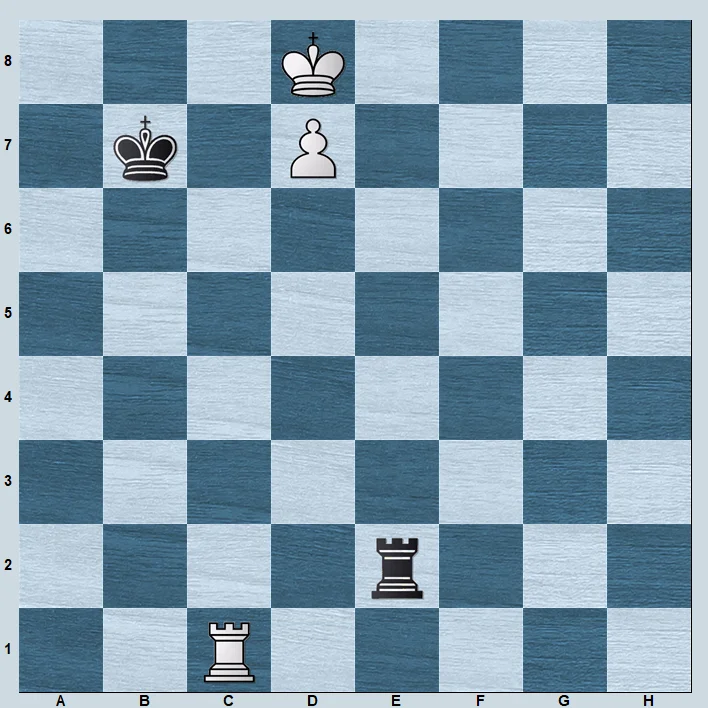
I was very close to winning the last round, where I had the following Rook endgame position.
Rook endgame vs ChessMood
Event
Position from my game
Date
2022.11.08
White
Rook endgame
Black
ChessMood
Result
*
The starting position is actually drawn. However, now you will see lot of mistakes from both sides. There were moments when White had winning chances. I won't explain everything right now. Because at the end of article, we will go back to this example and you'll identify and understand the mistakes on your own.
2...Rb8??
3.Kf6??
3...Rb6+
4.Kg5
4...Rb8??
5.f6??
5...Rb2$11
6.Kg6
6...Rg2+
7.Kf5
7...Rf2+
8.Ke6
8...Re2+
9.Kf5
9...Rf2+$11
However, after mistakes from both sides, the game ended in a draw. If you know the basic positions and techniques of Rook endgames you can instantly figure out what went wrong in the above game (we’ll come to it later).
Unfortunately, my training at that time focussed too much on learning middlegames, some general chess concepts, and not the endgames…
After that draw, I mentally struggled a lot. With a disheartened mood, I went to my coach and asked, “What have I done wrong? Why did this happen?”
Coach reminded me, “Remember I once said, how important endgames can be…?”
“Yes, but there are so many endgames, and I hate learning them… So what should I learn?”, I asked.
What he said next changed a lot for me. I even smiled through the mental tears. He said, “At your level (I was rated about 2000), you don’t need to know all the possible endgames. Instead, we’ll learn a set of positions that will be more than enough and cover your back in the different endgames you get!”
I had paid a big price for not properly knowing Rook endgames.
So with a desire to not make the same mistake twice, and with the help of my coach, I decided to train endgames weekly, giving special emphasis to Rook endgames.
Before studying Rook endgames, learn this
Surprisingly, with my coach we started with the pawn endgames. And there was a big reason for that. In the article on must-know pawn endgames, I’ve explained why. I’ll reinforce it again here with 2 examples.
In both the positions below, it’s Black to move.
What will be your decision – To exchange the Rooks or not?
If in position A, you played:
1…Rxd6 2.exd6 and 2…Kd7 (2…Kd8 also works), then you’ve got the following drawish pawn endgame.
While in position B, capturing with 1…Rxd6 2.exd6 leads to an absolutely lost pawn endgame position, where White will promote in a few moves.
Now if 2…Ke8 Ke6 wins or 2…Kf7 3.Ke5 Ke8 4.Ke6
Since it’s Black’s turn, they have to give up the opposition, and it costs them the game.
So instead of capturing the Rook in position B, there are several options to defend. The easiest is to keep the Rook on the 7th rank with 1…Ra7, and if the White King steps on the 6th rank (e6 or f6 squares), give the checks. You will understand these details later on.
My point is this – If you knew the fundamentals of pawn endgames, you would’ve known whether to exchange Rooks or not in Rook endings.
Why learning Rook endgames is so important?
Let me share with you the conversation we had another day while training endgames:
I asked my coach, “Why do Rook endgames occur more often than the other ones?”
He smiled and said, “The Rooks are the last pieces joining the game.”
Damn it! That’s so right! The minor pieces and Queens are often exchanged before the Rooks, which is why Rook endgames often occur. So there is nothing very surprising about the fact that I got that position in an important game!
As mentioned previously, Rook endgames are a vast topic. The good news is you don’t need to know every position, GM-level theories, or super advanced ideas.
Instead, I’m going to share all that my coach taught me that was enough for the U2000 level. We will see the main defensive and attacking techniques, and learn important ideas.
This way when Rook endgames occur, you’ll confidently play your best chess!
Let’s go ahead and begin!
Defensive techniques in Rook endgames
Here we will see several defensive ideas. Generally, the defending side wants to have the King in front of the pawn to be able to stop it.
Let me show you what happens if the defending king is far away or very much behind the pawn.
With the King very much behind the pawn, it seems impossible to prevent the pawn promotion.
Now that you know this, we’ll see positions when the defending King is in front of the pawn. Let’s begin with one of the most famous and important Rook endgame positions.
1. The Philidor position
Named after François-André Danican Philidor, the Rook endings you see below occur frequently. The side with a pawn advantage tries to advance and promote, while the defensive side prevents it.
I’ve highlighted the defensive technique in the game below.
Philidor position vs Rook endgame
Date
2020.11.21
White
Philidor position
Black
Rook endgame
Result
*
At the moment, it's Black to move. The correct idea is to play...
2...Rc6!
The easiest draw idea. Since the White King wants to move ahead, cutting it on the 6th rank is a great idea! But what if the pawn moves?
2...Rb8?
Waiting on the 8th rank doesn't work.
3.Kg6
3...Rb6+
4.f6
[%cal Ga7a8] Now the Black Rook needs to cover a check on the 8th rank, but that's not the only problem.
4...Rb8
5.Rg7+!
An important check, putting the Black King in an uncomfortable position.
5...Kf8
5...Kh8
is met with...
6.Rh7+
6...Kg8
7.f7+
7...Kf8
8.Rh8+
6.Rh7
Now there's a mating threat with Rh8.
6...Kg8
7.f7+
7...Kf8
8.Rh8+
8...Ke7
9.Rxb8
Winning the rook and the game. Now let's go back to see how Black defends.
3.f6
[%cal Gg5g6]
3.Rb7
If White waits, Black does the same on the 6th rank.
3...Ra6
3.Ra8+
3...Kg7
4.f6+
4...Rxf6
5.Ra7+
5...Rf7
draws immediately.
3...Rc1!
The White King is not yet on g6, and before that happens Black takes a comfortable position from behind, to deliver many checks after Kg6.
3...Rc8?
4.Kg6
Transposes to the lost positon we saw earlier.
4.Kg6
4.Ra8+
4...Kf7$11
is equal.
4.f7+$11
4...Kf8
5.Kf6
White is not on time for this. The Rook can go and cut the King on the 6th rank with Rc6+ or give lot of checks from behind.
5...Rf1+
6.Kg6
6...Rg1+
7.Kf6
7...Rf1+
8.Ke6
8...Re1+$11
4...Rg1+
5.Kf5
5...Rf1+
6.Ke5
6...Re1+
7.Kf4
7...Rf1+
8.Ke5
8.Kg3
8...Rxf6$11
8...Re1+
Being unable to get cover from the checks, White has to accept the draw. If the King goes closer to the Rook, and leaves the pawn undefended, Black can attack it as well.
9.Kd4
9...Rd1+
10.Ke3
10...Rf1
11.Ra6
11...Kf7
The f6-pawn will fall and the game ends in a draw.
Now we know the drawing technique and the winning ideas. We can make the following conclusion from the Philidor position:
The defending side tries to prevent King’s advancement.
Once the pawn steps on the 6th rank, the Rook goes down to give unlimited checks.
Logically if the setup occurring in the game doesn’t allow for the proper defense, the evaluation changes accordingly.
It’s much easier to defend if the attacking side has a Knight or a Rook pawn. Understanding that will be our next step.
2. Back rank defense
Positions with Knight or Rook pawns are quite common.
Back rank defense vs Rook endgame
Date
2020.11.21
White
Back rank defense
Black
Rook endgame
Result
*
This time there are 2 defensive options.
1...Rc8
In case of a Knight pawn, even waiting on the last rank works for the defending side.
1...Rb6
Draws very easily with the technique we previously learned.
2.Kh6
2...Rb8
Black just stands on the 8th rank, as there are no winning ideas for White.
3.g6
3...Rc8
Now let's check the idea which was winning in previous example, and understand why it doesn't win here.
4.Rg7+
4...Kh8
4...Kf8??
Loses, as White gets a chance to push the Black King away from standing in front of the pawn.
5.Kh7
5...Rc1
6.Rf7+
6...Ke8
7.Kg8
The winning 'Lucena' position occurs which we will dicuss later in the article.
5.Rh7+
5...Kg8
White has no options to advance, as there's no extra file (next to h) for the Rook.
6.Rg7+
6.g7??
Even loses due to
6...Rc6+
7.Kg5
7...Kxh7−+
6...Kh8
7.Ra7
7...Kg8
With a draw.
Against a Rook pawn, the defense is even easier.
The Rook delivers the checks as the King can’t hide behind the pawn.
Let’s summarize what we have learned.
If the pawn is located on a green line, it’s an easy draw and a bit more complex if the red line.
We have seen positions with pawns on F, G, and H files. Against pawns on a,b,c,d or e files, we’ll use one of the techniques mentioned above. Let’s summarize and make things simple:
The defending side should have their King in front of the pawn.
Against c, d, e, f pawn, you need to know the Philidor position and the 6th rank defense.
When defending against a, b, g, h pawn, just knowing the back-rank defense should help you draw.
Now let’s understand the technique to win with the attacking side.
How to win in Rook and pawn vs Rook endings?
For this, we do the opposite logic of what we learned in the previous section – prevent the defending side’s King from getting in front of the pawn or in other words:
1. Cutting off the King
This is one of the main strategies. In this, you use your Rook to cut off the enemy King. On the other hand, you use your King to support the pawn and push it forward against the enemy’s Rook.
Cutting off the King vs Rook endgame
Date
2022.11.09
White
Cutting off the King
Black
Rook endgame
Result
*
The general idea is to promote the pawn, but pushing directly will allow Black's King to step in front of it.
1.Re1!!
1.Kh4
1...Ke6
2.g5??
2.Rf1!! was still cutting-off the King and winning. The pawn push draws immediately as the Black King is able to rush to the defense.
2...Kf7
3.Kh5
3...Kg8
4.Kh6
4...Rb8
Transposes to the drawish position, with which you are already familiar.
1...Rb5
2.Kh4
2...Rb2
3.Kh5
3...Rh2+
4.Kg6
4...Rg2
5.g5
The Black Rook alone can't stop White's King and pawn advancement.
5...Rh2
6.Kf6
6...Rf2+
7.Kg7
7...Rg2
8.g6
8...Rf2
9.Kh7
9...Rh2+
10.Kg8
10...Rg2
11.g7
11...Rh2+−
Now if White King tries to step out, they will recieve lot of checks.
12.Rf1
Could be a logical move, trying to play Kf7, however Black also can defend the squares with their King.
12.Kf7
12...Rf2+
13.Kg6
13...Rg2+
12...Ke8
If you remember, we have seen this kind of position previously as well, and we will learn the winning technique in the next example.
The position we stopped at is when the king is in front of the pawn and trying to promote. This brings us to another very famous Rook endgame situation called:
2. The Lucena position
All of the positions you see below are Lucena positions. It’s a situation when the attacking side’s King is in front of the pawn.
Important Note: You need to be able to win in Lucena positions, otherwise you may get a winning setup, and not be able to win.
The defending side tries to cut off the attacking King with a Rook from one side, and use their King to limit the mobility of the attacking King from the other side. The attacking side wants to remove their opponents King and promote.
The technique I’ll show you now is very easy to learn and remember. Do it once and win forever!
Building a bridge vs Lucena position
Date
2022.11.10
White
Building a bridge
Black
Lucena position
Result
*
The White's King is locked on g8 with the Rook controlling h-file, and King from the other side. White needs to push away one of the blockers, for the King to move.
1.Re1+
1...Kd7
1...Kd8
Makes it even easier.
2.Re5
2...Kd7
3.Kf7
3...Rf2+
4.Kg6
4...Rg2+
5.Rg5+−
White promotes on the next move.
2.Re4
Has a deep idea, which you will understand in a moment!
2.Kf7
Gets under a lot of checks.
2...Rf2+
3.Kg6
3...Rg2+
4.Kf6
4...Rf2+
5.Kg5
5...Rg2+
White's King can't go lower ranks as the pawn on g7 will be lost, so it has to go back to g8.
2...Rh1
3.Kf7
3...Rf1+
4.Kg6
4...Rg1+
5.Kf6
5...Rf1+
5...Rg2
Black can try to wait on the g-file, what would you do?
6.Re5!
6...Rg1
7.Rg5
Again covering g-file and promoting the pawn.
6.Kg5
6...Rg1+
Da-dam!!
7.Rg4!+−
And White wins! This powerful technique is called "building the bridge". The White Rook covers the g-file and the pawn promotion is unstoppable.
Your opponent may try different ideas in some spots.
Lucena position 2 vs Example
Date
2020.11.21
White
Lucena position 2
Black
Example
Result
*
As we know our King is blocked on g8. While it's difficult to distract the opponent's Rook, we can force their King to leave the post!
1.Re1+
1...Kd6
Has an idea to attack the Rook!
1...Kf6
Allows the White King to go to the f-file. If instead the Black King goes to f6, it will become a shield, preventing any checks.
2.Kf8
2...Ra2
3.g8=Q
3...Ra8+
4.Re8
And White wins.
1...Kd8
Is the same as 1...Kd7
1...Kd7
Leads to the previous position.
2.Re4
2.Kf7 again gets under lot of checks.
2...Kd5
3.Rg4!
The Black King is too far and the attacking King gets out either way. On top of that, White's Rook covers the g-file, so the pawn can't be attacked.
3.Re7
Also wins! But the main line is easier to remember.
3...Kd6
4.Kf8
4...Ra2
5.g8=Q
5...Ra8+
6.Re8+−
3...Ke6
3...Rf2
4.Kh7
4...Rh2+
5.Kg6
And promotion is unstoppable.
4.Kf8
4...Rf2+
5.Ke8
[%cal Gg7g8] White promotes and wins!
Those were the main positions I learned after my big failure and I remember them even while sleeping. Try to wake me up at night and ask a question 🤪🤪🤪
I promised at the beginning that we will again take a look at my game and understand the mistakes. Even though it’s painful to remember (just joking). Let’s now go back to the game.
Back to my ghost
In my early childhood my father told me: There is nothing shameful in not knowing something, shameful is to know that you need to learn something, but not learn it.
Introduction position vs Solution
Date
2022.11.08
White
Introduction position
Black
Solution
Result
*
We're back to the position at the start of the article.
2...Rb8??
Starting from this move, what was Black supposed to play?
2...Rb6!
is better. Black uses the "Philidor position" to hold a draw.
2...Rg2+
Is also a draw, but it's extremely complex. In contrast, the 6th rank defense is more than enough!
3.Kf6
3...Kg8
3.Kf6??
A blunder.
3.Kg6
Easily wins!
3...Rb6+
4.f6+−
4...Rb8
5.Ra7
5...Rd8
6.Rf7+
6...Kg8
7.Rg7+
7...Kf8
8.Rh7
8...Kg8
9.f7+
9...Kf8
10.Rh8+
10...Ke7
11.Rxd8
11...Kxd8
12.f8=Q+
3...Rb6+
4.Kg5
4...Rb8??
Another blunder.
4...Rc6!$11
hold a draw again.
5.f6??
White blunders too.
5.Kg6
is the winning move.
5...Rb2$11
Now the game is drawn.
6.Kg6
6...Rg2+
7.Kf5
7...Rf2+
8.Ke6
8...Re2+
9.Kf5
9...Rf2+$11
From a long-term point of view, I can say that failing to win the position in the National Youth Championship was an important part of my successful chess career. I understood the importance of endgames.
The knowledge I gained lifted my confidence and improved my results exponentially with theoretical Rook endgames. It helped me in the future to win and save many important points.
As I previously mentioned, this topic can be extremely large, so let’s summarize what we learned and decide the next steps!
Conclusion
I hope you enjoyed what you learned, and that this knowledge will bring you many extra points! However, I mentioned that the Rook endgames, and endgames overall, are very large topics.
What you learned can be enough to play comfortably U2000. To go deeper, I recommend the following courses: Must-Know Endgame Theory U2000 and Endgame Roadmap where a lot more theory and general endgame principles are covered.
I would love to hear when the things you learned from this article help you in important tournament games!
You can let me know on the ChessMood forum.
See you in other articles, courses, youtube videos, or tournaments!
Yours,
GM Gabuzyan
Originally published Nov 15, 2022
Don’t forget to share this article!
We use cookies to run the site and, with your permission, to measure traffic and improve our marketing. You choose what to allow — see our Cookie Policy.
We use cookies to keep ChessMood working, to understand how it’s used, and to support our marketing. Strictly necessary cookies are always on; choose whether to allow the rest.
Strictly necessaryAlways on
Required for the website to work — signing in, keeping you logged in, security and fraud prevention, processing payments, and remembering your preferences. These can’t be switched off.
Analytics
Help us understand how the site is used and diagnose errors so we can make it better.
Marketing
Used to measure and personalise our advertising on other platforms and to credit referrals.
Check your email inbox shortly for your welcome email and for a ton of exclusive tips and advice from our Grandmasters.
It’s your journey and your next click!
Join our over 100,000 chess lovers and don’t miss your opportunity to speed up your
chess growth with exclusive tips and advice from Grandmasters, delivered into your inbox.