-
![GM Avetik Grigoryan]() GM Avetik Grigoryan
GM Avetik Grigoryan
The Complete Checkmate Patterns List (with examples)
Discover 37 important checkmate patterns, each explained with a practical example.
Tactics | 17 min read
Create your free account
This site is protected by reCAPTCHA and the Google Privacy Policy and Terms of Service apply.Discover 37 important checkmate patterns, each explained with a practical example.
Recently, my friend, who is a National Master in chess, sent me the following puzzle from the Tactic Ninja course’s quiz:
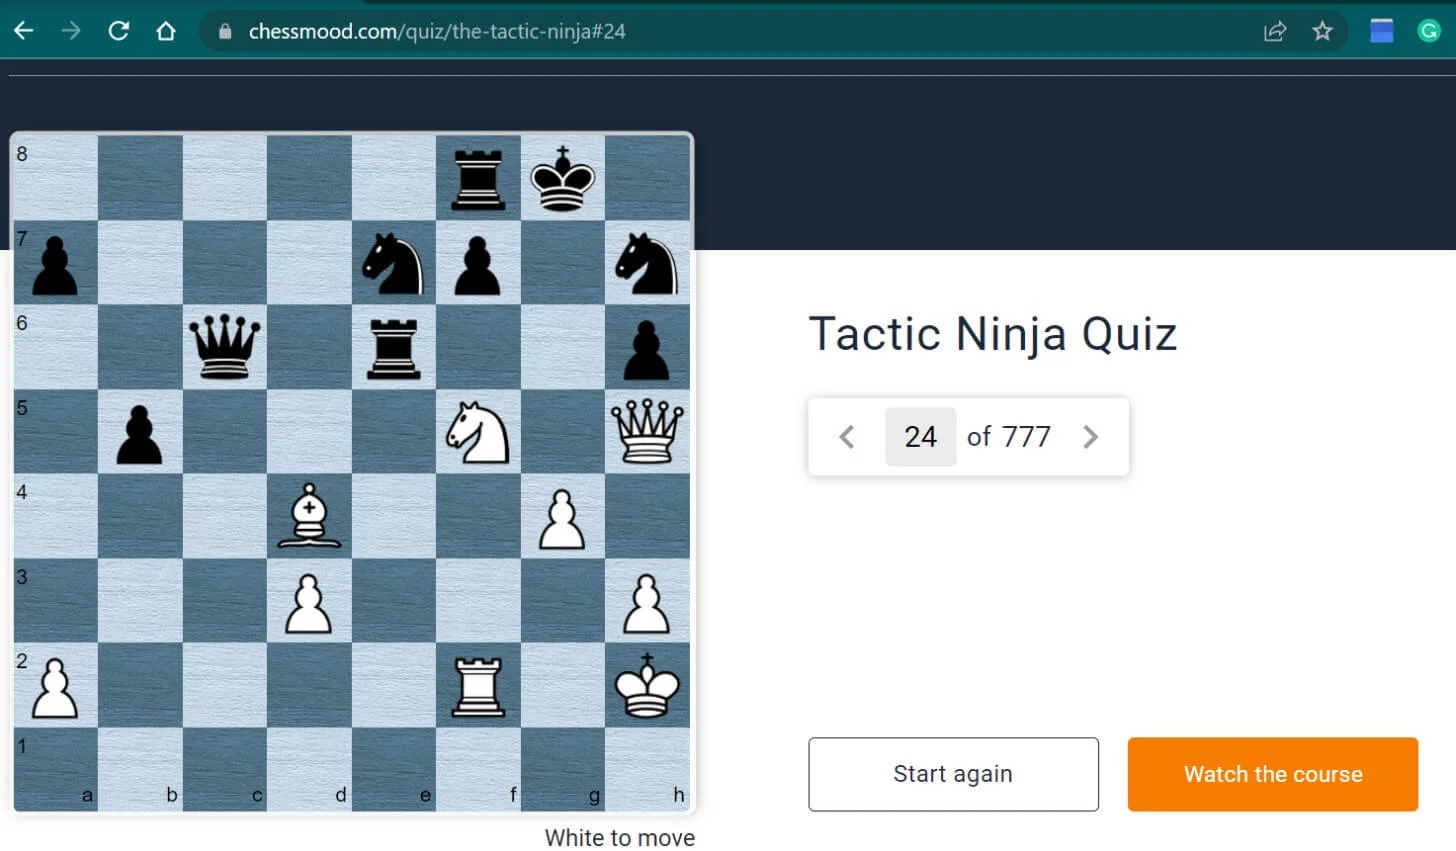
And said he couldn’t solve it.
Can you?
The reason was clear why he couldn’t.
His tactical skills were quite good. But as I said at the end of our Tactic Ninja course, the next step should be mastering the checkmating patterns!
If you notice all kinds of decoys, x-rays, and all other fancy tactical motifs, but you’re not very good with Mating Patterns, you’ll fail to find many chess tactics.
And the same way, you might start a brilliant attack, but fail to finish it, if your mating patterns knowledge isn’t very good.
This is where having a sharp eye for checkmate patterns helps.
As you get better at noticing such patterns, you’ll also improve your tactical and attacking skills!
At the end of the article, we’ll come back to this beautiful puzzle and the mind-blowing move.
But first, I’ll introduce you to 37 important mating patterns, each with 1 practical example.
Some of the patterns are common but are somehow not covered in most of the other articles, books, or learning resources. I’ve added them here and named them too 🙂
If you come up with better name suggestions, please share them in our forum – the link you’ll find at the end of the article.
After that, I’ll also share how you can further train and improve the skill of noticing these patterns and answer some of your common questions.
Ready?
Let’s go, starting with checkmating patterns with a lone Queen!
This checkmating pattern resembles an epaulette, a decorative shoulder piece worn on clothes, especially on a military uniform.
In this pattern, the king is in check and has no safe retreating squares to its side. Have a look at the position given below:

The pieces on either side of the King block its escape squares and look like an epaulette on the King’s shoulders.
Example:
In this mating pattern, the King’s retreating squares are blocked by its own pieces, standing diagonally backward. The mating pattern resembles a swallow’s tail.

Example:
This mating pattern is named after Carlos Cozio, who published a study on the same in 1766.
In this mating pattern, the King’s retreating squares are blocked by its own pieces, one standing horizontally & the other standing vertically.

Example:
This checkmate pattern occurs when a Rook and Queen work together to checkmate the enemy King in a 3 by 3 box shape, from which the enemy King cannot escape.
The Rook delivers the checkmate while the Queen assists it.

Example:
This checkmate looks like a triangle formed by the Queen, the Rook, and the enemy King.
Have a look at the position below:

The White Queen and Rook checkmate the Black monarch. Together, these 3 pieces form a triangle.
Example:
This mating pattern is a mix of the Kill box mate and the Triangle mate.
The Railroad Mate looks like an unstoppable train of a Rook and a Queen, moving along a rail track to checkmate the enemy King.
It’s a useful pattern know which will help you tremendously in a blitz game when you have little time to checkmate. This pattern is more of a ‘process’ than the ‘final checkmate position’.
Check out the simple position below, and you’ll understand:
And here's an advanced puzzle...
This checkmate pattern combines the powers of a Queen and a Bishop and is named after a German chess player Max Lange.
The Queen delivers a checkmate. The Bishop protects the Queen and controls an important square. Here's a simple example.
Now an advanced puzzle...
Another mating pattern features the Bishop-Queen pair. Here, the Queen does a great job of covering most of the enemy King’s escape squares. The Bishop moves in to deliver the checkmate. The final position looks like a pair of scissors.

Example:
The Queen-Knight pair has a reputation for being a dangerous attacking duo. But for some reason, the mating patterns with this duo are missing from most of the chess literature out there.
So we took matters into our own hands and gave them some cool names!
In this checkmate, the enemy King is trapped in the corner of a board. The Queen chokes it by controlling all of its escape squares while the Knight jumps in to deliver the checkmate.
Here's how it could look:


Example:
This pattern is similar to the Bucking Bronco Mate, but there’s a slight difference.
In this case, the enemy King isn’t stuck in the corner but rather on the edge of the board, and its escape square is blocked by one of its own pieces.
The rest remains the same – The Queen chokes the escape squares, and the Knight lands the final mate as you can see from the following position:

And here's a practical example:
Next up are checkmates with a Queen and a pawn. Sometimes just a helping hand from a pawn is all it takes to finish off the game!
In this mating pattern, the Queen delivers a checkmate through the 7th rank and from the edge of the board while being protected by an ally. The escaping squares of the enemy King are blocked or controlled.
This mating idea was first published by Pedro Damiano, a Portuguese chess player in 1512, making it one of the oldest patterns.
First, have a look at this simple example:
And now this advanced example:
This is another common checkmating pattern. Here, the Queen lands the final blow against a castled King while protected by the pawn.

Example:
Those were all the important mates with the Queen! Let’s move to mating patterns with the 2nd strongest piece – the Rook!
The back rank is the most popular checkmate pattern!
As the name suggests, here the enemy king is trapped on the last rank behind its own pawns and gets checkmated by either the Rook or the Queen.
![]()
Example:
A rook is powerful on the 7th Rank. And 2 Rooks are even more powerful.
In the blind swine mate, 2 Rooks work with each other on the 7th rank to deliver a checkmate.

Example:
In this mating pattern, 2 major pieces (2 Rooks or Rook + Queen) work together to push the enemy king towards the edge of the board and eventually checkmate it.

Example:
This mate is usually carried out along the h-file against the castled King, with the Rook delivering the mate while the Bishop protects it.

Example:
This checkmate is quite similar to the h-file mate, as it involves both the Rook and Bishop in similar roles. The Rook delivers mate while the Bishop protects it.
In contrast to the h-file mate, here, the enemy King gets checkmated not on the edges but on the other files of the board.

Example:
The Mayet’s Mate is a checkmate pattern where a Rook is placed right next to the enemy King while being supported by a Bishop. It’s similar to Opera Mate. The difference is that here the mate occurs from a different direction.
This pattern is named after the German player Karl Mayet and it looks like this:

Example:
A famous chess player of the 19th century, Richard Reti won a beautiful game against Savielly Tartakower using this checkmate. And that’s where the name of this mating pattern comes from!
Have a look at the game below:
As you can see in the final position, it’s the Bishop that delivers the final blow while the Rook supports it. The enemy King’s flight squares are often blocked by its own pieces.
And here's a more advanced example.
In this checkmate, named after Harry Pillsbury, the Bishop controls the corner square of the castled King, while the Rook delivers a mate on the open file. The escape squares of the enemy King are blocked by their own pieces.

Example:
Here, the enemy King is trapped in the corner. The Rook cuts off the important escape squares on the file/rank. The Bishop moves in to deliver a checkmate.
This mate is named after the legendary American chess player, Paul Morphy.

Example:
In this checkmate pattern, the enemy King is trapped and exposed on the edge of the board. The Bishop controls one of its escape squares, while the other is blocked by its own pieces. The Rook moves in to deliver the final blow. It’s named after the famous player of the 18th century Gioachino Greco.

Example:
The Rook and Knight coming together are the next patterns…
As the name suggests, this checkmate is delivered in the corner. Here, the Rook cuts off important escape squares on a file/rank. The Knight jumps in to deliver the final attack and end the game.

Example:
Here, the enemy king is trapped on the edge of the board. The Rook delivers a checkmate, while the Knight controls two important flight squares of the enemy King.
Another flight square of the enemy king is usually blocked by its own pawn.

Example:
This is an important and unique pattern that shows the combined power of the Knight and Rook in action. Together, these pieces cover all of the enemy King’s flight squares, which is trapped in the corner.
The Rook delivers the checkmate supported by the Knight.

Example:
This mate in chess is named after IM Vladimir Vukovic, who showed this pattern in his book – ‘The Art of Attack in Chess’.
This mate is carried out by 3 pieces –
Here's how it looks:

Example:
Another checkmate pattern involving a Rook, a Knight and a pawn. The Rook delivers a mate while being supported by the Knight, which in turn is being supported by a pawn.
This makes it impossible for the enemy king to capture the Knight or the Rook. The remaining escape square is blocked by the enemy King’s allied pawn.

Example:
Next, we’ll see mating patterns featuring a Rook and a Pawn.
In Anderssen's Mate, the Rook delivers a checkmate on the 8th rank, standing immediately next to the enemy king and supported by a pawn on the 7th rank. The supporting pawn is protected by another piece/pawn.

This pattern is named after the chess player Adolf Anderssen, who finished off this game with a beautiful checkmate against Zukerort! Have a look at the finish below:
You just saw the most important checkmates with the major pieces. Now we will cover mates with the minor pieces, starting with the Bishops!
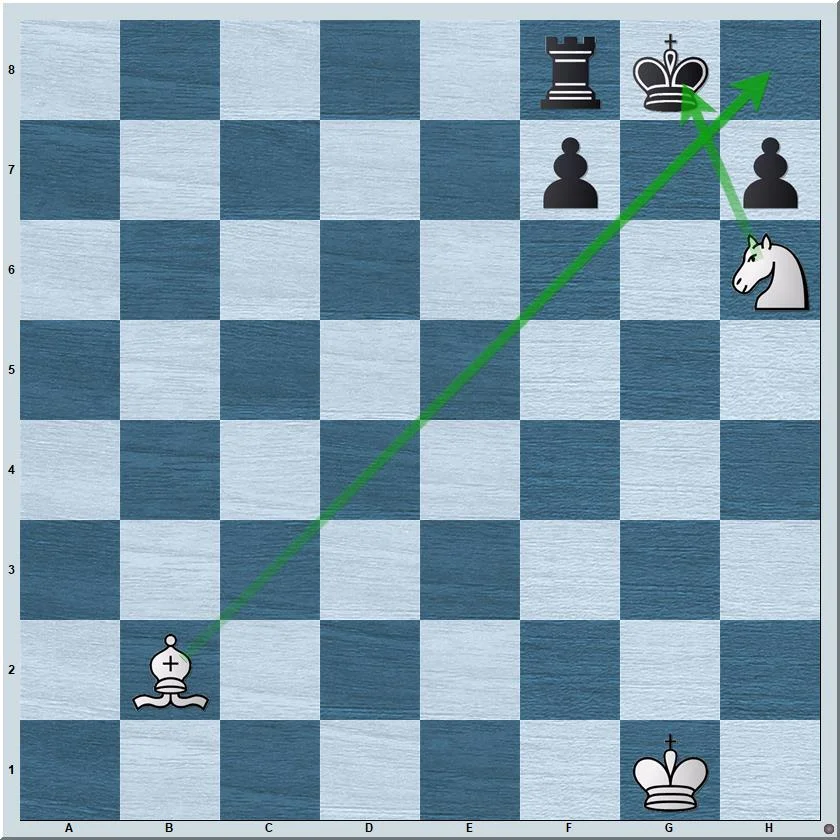
Sometimes, just a lone Bishop can be enough to finish off the game. And in this beautiful chess mating pattern, the Bishop traps the enemy King with a deadly blow on a diagonal.

Example:
This is another mate that most of the chess literature hasn’t covered. Even we were surprised while researching this mating pattern with 2 Bishops. I’ve seen it happen in so many games. Here, the 2 Bishops bombard down their respective diagonals trapping the enemy King. One of them delivers a checkmate while the other controls the escape squares.

Example:
In this checkmate pattern, the two Bishops work like a pair of scissors to trap the enemy King. It’s named after Samuel Boden after he used it in one of his games.

Example:
Just like the Bishops can finish off the game, so can the Knights. We cover the checkmating patterns with this piece next…
This is one of the most popular and beautiful checkmates in chess! It occurs when a lone knight mates the enemy King whose escape squares are blocked.

Example:
Another checkmating pattern that’s not covered in the chess literature. They often lead to beautiful finishes. As the name suggests, the Knights roll together to finish off the game.

Example:
By now, you’ve seen checkmating patterns with only Bishops and only Knights. What happens when the Bishop and Knight join forces? Let’s have a look…
In this mating pattern, the Bishop suffocates the enemy King by controlling some important escape squares, while others are blocked by friendly pieces. On the other hand, the Knight lands the final checkmate!
Example:
In this mating pattern, the Bishop delivers a checkmate while the Knight controls the escape squares. It’s very similar to the Suffocation Mate. The only difference is that the roles of the minor pieces are reversed here.
Some escape squares of the enemy King are blocked by its own pieces!

Example:
This mating pattern features 3 minor pieces – 2 Bishops + 1 Knight. 2 minor pieces control the escape squares while the remaining one delivers a checkmate.

Example:
In this checkmate pattern, a pawn delivers a mate! The enemy King’s escape squares are controlled or blocked by its own pieces. Even though it’s rare, this is one of the favorite checkmates of many chess players!
Example:
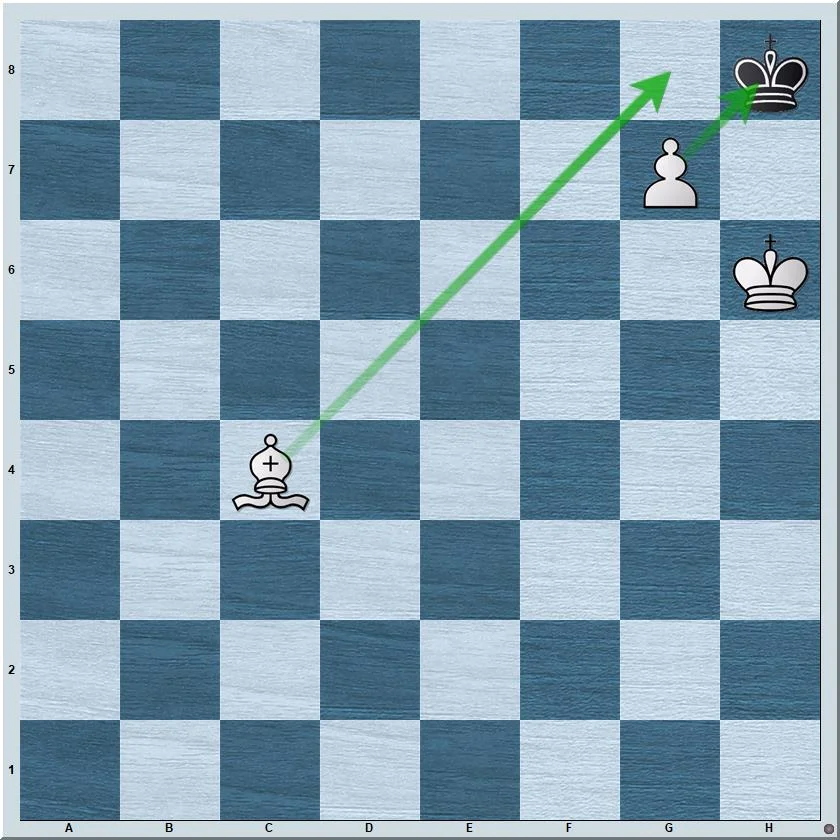
Now that you’ve learned the mating patterns, I offer you to solve the puzzle one more time if you couldn’t at the beginning.

Could you?
It’s great if you said yes!
Here’s the solution:
So, my friend, learning all the tactical patterns and constantly sharpening your tactical eye, is the first step. But you’ll fail to notice tactics if your knowledge of mating patterns in chess is weak.
And just knowing isn’t enough. You should master them.
I’ll tell you how to do that in a minute, but first, let me answer some common questions you might have.
No – memorizing the names of all checkmating patterns isn’t necessary.
I can’t too 🙂 Seriously!
I just wrote this article, but I can remember maybe a little bit more than half of them 🙂
Yeah, my memory isn’t strong. But at the same time, there is no reason to remember the names, thats why my brain doesn’t make effort.
So, I don’t recommend being fancy and learning the names.
What you should remember though is the arrangement of pieces and the final checkmating position.
After all, the main goal of studying checkmating patterns is to recognize them when they appear on the chessboard.
Improving mating pattern recognition is similar to the process of improving chess tactics.
First, you should be aware of the different mating patterns. Otherwise, you simply won’t know what to look for in the position.
Once you’re familiar with the mating pattern, solve puzzles based on that particular theme. This way you train your mind to look for the checkmating pattern.
With enough repetition and practice, your mind should start noticing these patterns without you actively paying attention.
Usually, when you have pieces near the enemy King, there might be a mating pattern lurking around the corner. Stay alert during such instances.
Also, regularly solving puzzles on checkmating patterns trains your mind to notice them in a real game.
For step-by-step training to improve your mating pattern recognition, check out the Mating Matador course.

If you’re a ChessMood student, you’ve free access to it.
Just go to the course, and go through the sections one by one, following the instructions I’ve shared with you in the introduction part.
At the end of the course, you’ll be amazed how easy it has become to notice those mating patterns.
Wishing you the best of luck and many beautiful games finishing with the matting patterns you’ve learned.
P. S. On our chess forum, you can tell us which mating pattern you were not familiar with at all, and which one you know but you forget a lot.
Originally published Dec 6, 2022